
Table of Contents
- Why Check Writing Still Matters
- Understanding Check Anatomy
- Step-by-Step Check Writing Instructions
- Common Check Writing Scenarios
- Safety and Security Measures
- Digital Alternatives to Checks
- Frequently Asked Questions
Why Check Writing Still Matters in a Digital World
In today’s digital payment landscape, you might wonder why learning to write a check remains relevant. Despite the convenience of Venmo, Zelle, and credit cards, checks continue to play a crucial role in specific financial situations. Understanding when and how to use checks is an essential financial literacy skill that can prevent embarrassing moments and financial mishaps.
Common situations where checks are necessary or preferred:
- Security deposits for rental properties
- Payments to small businesses and contractors
- Large transactions where credit card fees are prohibitive
- Formal gifts for weddings or other special occasions
- Payments to government agencies
- Situations where electronic payment isn’t available
According to recent Federal Reserve data, while check usage has declined, Americans still write approximately 14 billion checks annually. This demonstrates that check writing remains a vital financial skill worth mastering.
Understanding Check Anatomy: A Visual Guide
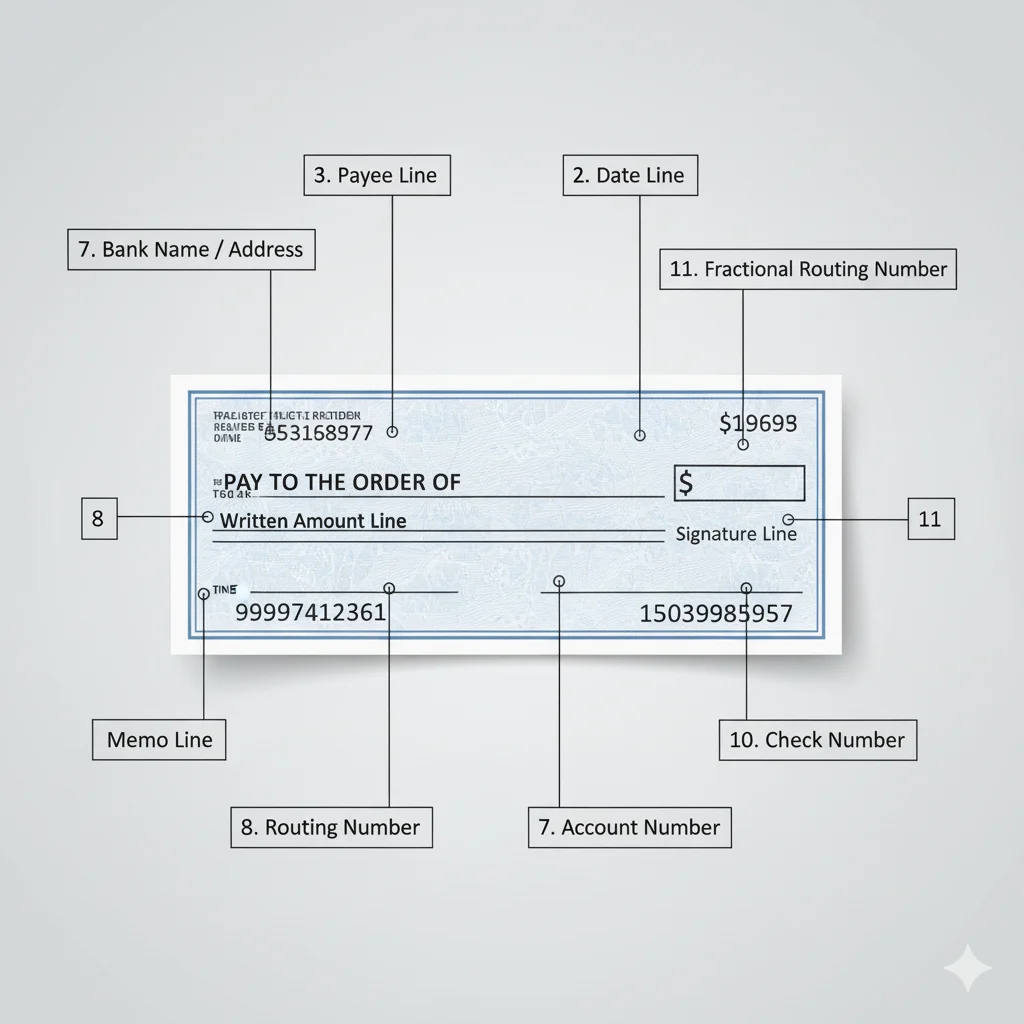
Before you write your first check, it’s essential to understand each component. Here’s a detailed breakdown of a standard personal check:
Key Components You Need to Know:
- Personal Information (Top Left): Your pre-printed name and address
- Check Number (Top Right and Bottom): Unique identifier for tracking
- Date Line (Top Right): Where you write the current date
- Payee Line (“Pay to the Order Of”): Recipient’s name
- Amount Box (Right Side): Numerical amount
- Amount Line (Center): Written amount in words
- Memo Line (Bottom Left): Optional payment description
- Signature Line (Bottom Right): Your legal signature
- Routing Number (Bottom Left): 9-digit bank identifier
- Account Number (Bottom Center): Your account number
- Check Number (Bottom Right): Repeated for processing
Step-by-Step Check Writing Instructions
Step 1: Date the Check Correctly
Location: Top right corner date line
Instructions:
- Write the current date using the format: Month Day, Year (e.g., “October 28, 2024”)
- Use the actual date you’re writing the check
- Write clearly and legibly
- Avoid post-dating (using future dates) as recipients may deposit checks immediately
Common Mistakes to Avoid:
- Using abbreviations that could be altered
- Writing in pencil instead of pen
- Using unclear number formation
Step 2: Write the Payee’s Name
Location: “Pay to the Order Of” line
Instructions:
- Write the complete, legal name of the person or organization
- Use full names rather than nicknames
- For businesses, use the exact registered business name
- If unsure of the exact payee name, ask for verification
Examples of Correct Payee Entries:
- Individual: “Sarah Elizabeth Johnson” (not “Aunt Sarah”)
- Business: “Johnson Contracting Services LLC” (not “Johnson’s plumbing”)
- Organization: “Springfield Elementary School PTA”
Step 3: Fill in the Numerical Amount
Location: Small box with dollar sign ($) on the right
Instructions:
- Write the amount clearly starting from the left edge
- Include dollars and cents separated by a decimal point
- For whole dollar amounts, add “.00” for cents
- Keep numbers within the box boundaries
Formatting Examples:
- One hundred fifty dollars: “$150.00”
- Two thousand dollars: “$2,000.00” (commas optional)
- Forty-five dollars and twenty-five cents: “$45.25”
Step 4: Write the Amount in Words
Location: Long line beneath the payee information
Instructions:
- Write the dollar amount in words
- Use “and” before the cents portion
- Express cents as a fraction over 100
- Draw a line through any remaining space
Detailed Examples:
- $150.00: “One hundred fifty and 00/100”
- $2,000.00: “Two thousand and 00/100”
- $45.25: “Forty-five and 25/100”
- $1,250.75: “One thousand two hundred fifty and 75/100”
Pro Tip: If the numerical amount and written amount differ, banks legally honor the written amount. This makes accuracy crucial.
Step 5: Complete the Memo Line (Optional but Recommended)
Location: Bottom left corner, typically labeled “Memo” or “For”
Instructions:
- Briefly describe the payment purpose
- Include account numbers for bill payments
- Add invoice numbers for business payments
- Use clear, concise descriptions for personal records
Effective Memo Line Examples:
- “January 2025 Rent”
- “Invoice #45892”
- “Account 987-654-321”
- “Birthday Gift”
Step 6: Sign Your Check
Location: Signature line in bottom right corner
Instructions:
- Sign exactly as your signature appears on bank records
- Use consistent signature style
- Sign only after all other fields are completed
- Never sign a blank check
Signature Guidelines:
- Ensure signature matches bank records
- Sign legibly but securely
- Use permanent ink only
- Don’t allow others to sign for you unless they’re authorized signers
Recording Your Check: Essential Follow-Up Steps

Why This Step is Critical:
- Prevents overdraft fees
- Maintains accurate account balance
- Provides financial tracking
- Helps detect potential fraud
How to Record Checks Properly:
- Use Your Check Register
- Record check number
- Note transaction date
- Write payee name
- Log payment amount
- Subtract from running balance
- Digital Tracking Options
- Mobile banking apps
- Budgeting software (Mint, YNAB)
- Spreadsheet templates
- Digital check registers
- Reconciliation Process
- Compare recorded transactions with bank statements
- Verify all checks have cleared
- Investigate discrepancies immediately
- Update records regularly
Common Check Writing Scenarios and Solutions

Writing Checks for Cash
Situation: Need to withdraw cash without visiting an ATM
Solution:
- Write “CASH” as the payee
- Sign the check normally
- Endorse the back when cashing
- Security Warning: This makes the check negotiable by anyone – use cautiously
Writing Checks to Yourself
Situation: Transferring money between accounts
Solution:
- Write your full legal name as payee
- Follow standard check writing steps
- Deposit at receiving bank
Post-Dated Checks
Situation: Wanting to delay payment until a specific date
Solution:
- Write future date on date line
- Understand that recipients may still deposit early
- Maintain sufficient funds to cover early deposit
Business and Professional Payments
Situation: Paying contractors, vendors, or service providers
Solution:
- Use exact business name
- Include invoice numbers in memo
- Keep detailed records for tax purposes
- Request receipts for significant payments
Advanced Check Writing: Security and Fraud Prevention

Preventing Check Fraud
Check fraud costs Americans billions annually. Protect yourself with these measures:
Security Best Practices:
- Use Security Pens: Gel pens or fraud prevention pens with special ink
- Fill All Space: Draw lines through empty spaces in amount fields
- Consistent Penmanship: Write clearly and consistently
- Secure Storage: Keep blank checks in a locked location
- Regular Monitoring: Review bank statements promptly
- Shredding: Destroy voided checks thoroughly
Identifying and Correcting Errors
Common Check Writing Errors:
- Date mistakes
- Payee name misspellings
- Amount discrepancies
- Missing signatures
Error Correction Protocol:
- Minor Errors:
- Draw single line through error
- Write correction above
- Initial beside correction
- Many businesses won’t accept corrected checks
- Major Errors:
- Write “VOID” across entire check
- Record in check register
- Start over with new check
Digital Alternatives to Traditional Checks

While check writing remains important, modern alternatives offer convenience:
Electronic Options:
- Online Bill Pay: Bank-sent electronic payments or paper checks
- Peer-to-Peer Apps: Venmo, Zelle, Cash App for personal payments
- Bank Transfers: ACH and wire transfers for larger amounts
- Digital Wallets: Apple Pay, Google Pay for in-person payments
When to Choose Digital Over Paper:
- Urgent payments needing quick processing
- Regular recurring bills
- Small personal transactions
- Situations where tracking is essential
Frequently Asked Questions
Q: What’s the safest way to write a check?
A: Use a gel pen, fill all empty spaces with lines, write legibly, and never sign blank checks. Monitor your account regularly for unauthorized activity.
Q: Can I write a check if I make a mistake?
A: For minor errors, you may correct and initial, but many businesses won’t accept altered checks. For significant errors, void the check and start over.
Q: How long is a check valid?
A: Personal checks are typically valid for 180 days (6 months), though some banks may honor older checks. Business checks may have shorter validity periods.
Q: What’s the difference between routing and account numbers?
A: The routing number (9 digits) identifies your bank. The account number (variable length) identifies your specific account at that bank.
Q: Is it safe to mail checks?
A: Generally yes, but use security envelopes, consider certified mail for important payments, and notify recipients to watch for them.
Q: What should I do with canceled checks?
A: Keep them for tax purposes (typically 3-7 years depending on the transaction), then shred them securely.
Conclusion: Mastering Check Writing for Financial Confidence
While digital payment methods continue to evolve, check writing remains a vital financial skill. By following these comprehensive instructions, you can write checks with confidence, maintain accurate financial records, and protect yourself from potential fraud.
Remember these key points:
- Always use permanent ink and write clearly
- Double-check amounts in both numerical and written forms
- Record every transaction immediately
- Review bank statements regularly
- Understand when digital alternatives might be better
This knowledge ensures you’re prepared for any payment situation, making you more financially capable and secure. For more financial education resources, explore our guides on budgeting, saving, and digital payment security.

Michael Smith is the creator of PikupLab.com, known for crafting engaging, SEO-smart content that connects with modern audiences.
He specializes in turning niche topics into high-ranking, reader-focused articles.